Sunday 30 March 2014

Friday 28 March 2014

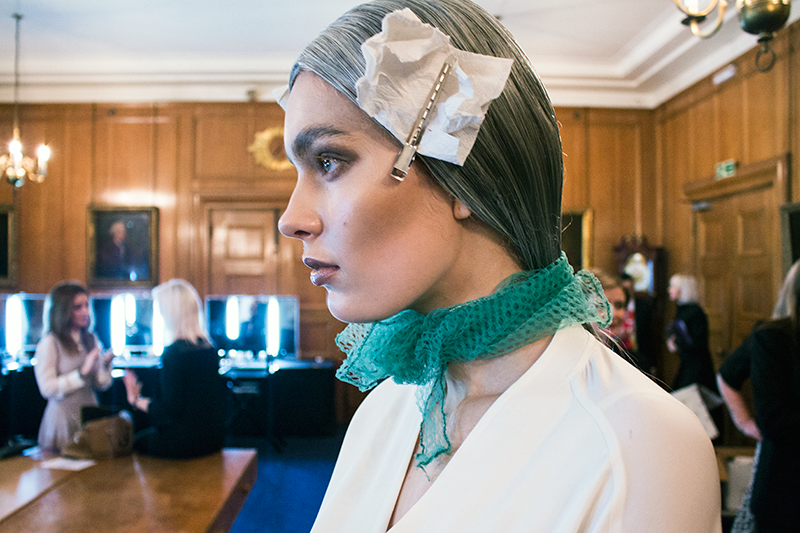
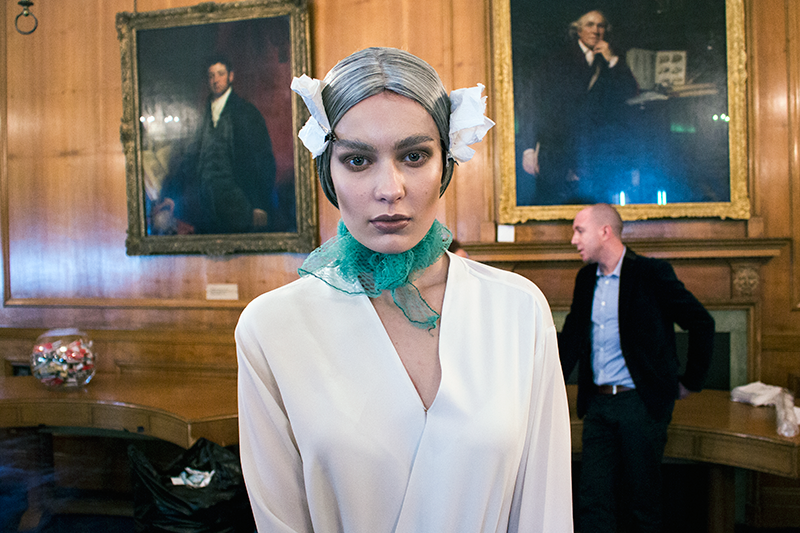
ACCESSORIZING THE HAIR
Using crimping or scrunching to create a style

Hair nets can help hold styles into place, match clients hair to the net. These are available at most pharmacy's.

VASELINE - Can be used to add gems to the hair
* To remove grease based products use shampoo


STYLING
- Scrunch hair to add texture and volume
- Leave small sections out by the ears (square sections)


- Secure roll using grips
- Feed through any fabric at this stage if using a scarf
- Pull & tease hair outwards to create the shape
- Twist sides around and secure


Friday 21 March 2014

CREATING TEXTURE
Adding Lift
Beauty Hair Practical


CRIMPING
Crimping can add volume to the hair which can be used to create a structured style that holds its shape.
- Crimp middle section of the hair upwards to the root
- Back comb genitally using a tail comb
- Back combing creates a scaffold effect which can then have hair layered over the top, hiding the crimp
- When crimping ensure hair is sectioned properly to prevent drag
- Take small sections & lift hair upwards, placing comb under to prevent burning


DIFFUSING
Use mouse and sea salt
- Spritz hair with water so it is 10% wet, this will allow the structure of the hair to be changed
- Add a small amount of mouse to the mid lengths and ends
- The diffuser allows air flow in a large area, creating less damage
- Scrunch using hands to assist waves
- Ensure hair is fully dry 
- If using sea salt add shine spray as product can make the hair look dull
(salt can strip goodness from the hair)


Thursday 20 March 2014

MIRIJANA VASOVIC
MASTER CLASSES

Mirijana Vasovic, assistant of Val Garland has worked at the very top of the fashion industry, previously working for MAC artist relations has so much knowledge to offer. Through 3 sessions with her I learnt so many different skills which will be essential to me through out my future career. She spoke frankly about the industry and was a breath of fresh air encouraging us and giving us one to one feedback through out the sessions on the practice we were doing. 
______________________________________________________________________________

PERFECT LIPS
Mirijana made it clear that there is always a mood in makeup. When creating a lip look it is essential to consider the shape of the lip and what that shape portrays to an audience. The shape is what creates the dynamic of a character. 


In our first session Marijana demonstarated how to create the perfect lip quickly! Something many of us struggle to perfect she showed us simple steps to follow when under pressure. Using blue Mac mixing medium on the lips to create a bold matte lip that is even harder to perfect than a red lip. She started by concealing the lip to create a clean canvas and blocking out any of the natural lip colour. Using a large flat round edge brush she was able to create a soft curve to the cupids bow and a sharp line across the rest of the lip. 
She next taught us how to experiment with product to create a beautiful smokey eye using products like a lip liner and gloss on the lids. As makeup students we tend to stick to the label of a product rather than treating out products as an artist's palette. She looks a different products as a texture and a shade rather than a lipstick or eye shadow.


My attempt 'perfect lips'

______________________________________________________________________________

FLAWLESS SKIN & NATURAL BROWS
During our second session Mirijana went through how to create a flawless fresh base. She taught us about the importance of prepping the skin. This is the most important stage to a makeup look and the most time should be focused on it.

 She started by cleansing the skin using Bioderma, a product I have recently discovered myself which is really gentle on the skin and removes all makeup residue without drying the skin. She next massaged a non greasy moisturizer into the skin using her finger tips to really work the product into the skin and neck. Instantly this brings the blood to the surface of the skin giving instant radiance and bringing life into the skin. After working the product into the skin she then applied a thin layer of face and body foundation by Mac across the complexion. This foundation is perfect for photography and catwalk, with no SPF it will not cause a white cast across the face and is really build-able and blend-able. She told us about a little trick she uses if she needs a higher coverage on a model, which is to warm the product in the palm to create a thicker consistency to the foundation. 
Next she gave us a demonstration on how to create a naturally defined brow that doesn't look harsh or out of place. Using cool toned powder products with a small pointed brush to imitate individual hairs creates a natural finish to the brow. Brushing the brows up with a spooly also helps to keep the brow looking neat and tidy.
We were also challenged to produce a perfect red lip in 4 minutes, putting what we were taught in our previous session with her to practice.


______________________________________________________________________________

GRAPHIC LINER

Our last session with Mirijana was all about creating perfect graphic eye liner. Something I have a huge passion for! Using a small pointed brush she taught us about how to use angles to suit everybody's eye. Taking the line from the lower lash line outwards to carry on the line. 
Mirijana taught us how to create an illusion using liner. Creating a triangle shape when the eye is shut that looks like a normal winged liner when the eye is open. To create this it was essential to find the correct position on the eye inside the crease in order to allow the line to flow when the eye is open. 


The second liner was crisp and elongated. She taught us of the importance of cleaning lines. Often when using liner the line created is not completing perfect. To crisp up the line she used a hard angled brush with a small amount of Bioderma to make the line perfectly straight. This works better than using a cotton bud because the brush is at a completely straight angle rather than being a fluffy ball.

My attempts at graphic liner

Wednesday 19 March 2014

BAUHAUS SHOOT
With fashion photographer Chloe

Working with another Fashion Photography student Chloe with the same Bauhaus theme allowed me to create a makeup look with a completely different angel. Originally the photographer wanted a grid shape painted across the face with the lips blocked out in blue. I did not think this would look polished and it would clash against the garments she had brought to style the shoot. We decided on a sharp graphic liner look inspired by Pat Mcgrath. This would be complimented by a bold lip.


Preview images from the shoot

Making the skill flawless was a key part of this look. I used Illamasqua skin base to create an even skin tone. On top I used Mac Harmony blush to contour the face as well as TheBalm highlighter on the top of the cheek bones. 


Working with Afro hair was definitely a huge challenge for me as I has never been taught how best to style it. Naturally the models hair was in tight spiral curls. The photographer wanted her hair to be poker straight, slicked up into a high ponytail with different coloured ribbon around the base. I found it difficult to smooth the hair out and this is something I need to practice a lot as well as learn what the best products would be to keep in my kit in order to style Afro hair. 


Eye liner has become one of my strongest skills within makeup, I wear it everyday myself and also use it on a lot of my makeup clients at work for part makeup. It is such a key staple and I am so happy I feel confident with the application of perfect liner. 
_________________________________________________________________________________

LOOK TWO


Tuesday 18 March 2014

BAUHAUS
COLLABORATION
with Katie Player

During this project I am taking every opportunity to collaborate with as many people as I can. Although this theme doesn't fit in with my brand it was a great opportunity to practice some of the new skills in beauty makeup I have learnt over the past month.


Katie the photographer I was working with sent me a variety of different images based on the Bauhaus art movement found in 1920's German. We often associate  white walls, clean lines and the use of glass and concrete as modern and contemporary ideas. And they are, except that those same ideas have been around for nearly a century now thanks to the unique influence of the Bauhaus school of art and architecture. 

Together we produced a mood board to inspire the makeup I would create on the day. Katie wanted to produce a series of images as part of a fashion supplement featuring different clothing and jewelry.  The makeup I created needed to be versatile as it would be kept the same across all the clothing changes. Using primary colours was a key aspect of the style. 

Creating a clean skin was essential to making the colours pop around the eyes and lips. Using tape I was able to create sharp lines around the eyes, inspired by Pat Mcgrath's makeup look for Dior's fall couture collection in 2010. She used sharp lines and contrasting colours to create beautiful and clean makeup.


Over all I was really happy with the look produced for this shoot and the feedback from the photographer was great! I was able to use the skills learnt in order to create a flawless natural finish to the skin. I also used the techniques taught to create a perfect red lip. I feel my makeup is becoming more refined. 

The hair was kept very simple swept off the face into a high pony tail I made sure it was sleek and perfectly central. Beauty hair doesn't look very complex but I have learnt the key to creating a perfect finish is to prep the hair correctly. To create this hair look I started by running styling oil through the lengths of the hair the to achieve a poker straight finish I ran GHD's through before putting the hair into a ponytail. 
RETRO SHOOT
Photographed by Natasha Ayres

Collaborating with fashion photography student; Natasha Ayres was a great opportunity to practice some of the skills learnt this semester to create a clean beauty look. She is producing a beauty supplement magazine for one of her units. Overall she wanted a vintage feel to the look. I wanted to create a very flawless glow to the skin with a 60's inspired liner and high pony tail with a soft pop of pink on the lip.

This look was all about perfect skin. Using a combination of Illamasqua's skinbase foundation and Mac's strobe cream I was able to achieve a polished look to the skin without looking to fake or mask like. 


To create the perfect lip I focused on creating clean edges first. Using a wide brush I applied the colour using the shape of the brush as a guide. This allowed me to achieve a really crisp edge to the lip with no jagged lines. 


The models hair was naturally short and Natasha wanted me to incorporate a long thick hair piece to create a super sleek long pony tail. She wanted the pony to have a strong upward structure. To start with I found this difficult due to the weight of the hair piece. Instead of just relying on the metal band to hold the structure forward I experimented and pushed a disposable mascara wand through the middle which helped to hold the structure in place above the head.


This shoot incorporated a variety of different pastel shades which fits incredibly well within the development of my brand imagery. Although I feel the makeup on this particular shoot is to strong for my brand imagery it was a great way to develop imagery that can be used to inspire my future designs.


The vintage feel to the images is well suited to the vintage Parisian feel Paul & Joe display with their products. When shooting my final looks I would like to use soft lighting in order to imitate this overall feel across all of the images. 


Patterns are also a key feature within Paul & Joe's products which cross over from their clothing line to their beauty line. I want to create my own paintings and drawings to inspire my makeup designs and colour pallettes. Each final image will be created with an influence from a image I have created. These paintings will also feature the specific colour palette for each look.


'DESIGNERS EYES' 

Makeup is far more than just a cosmetic, when creating a look it essential to look through a designers eyes breaking a look down into different elements. It is important to focus on the fine details within a concept.

SHAPE
size - scale - form 
COLOUR
complimentary - warm - contrast - tone - cold - shade
TEXTURE
smooth - rough - matte

Within our discipline of makeup the most important shape is the SILHOUETTE!


When looking at colour it is important to be specific, this will allow you to communicate ideas to other creatives you might be working with. Learning the different colours across the spectrum is essential to achieving this.


Makeup needs to be used to compliment and enhance rather than the mask a face. Learning what tones and colours compliment each other is important when making the choice of colour palette. Different skin tones suit different colours. What suits one person might not be suitable for someone else. 

PAUL & JOE BEAUTE
Paul & Joe Beaute have a strong colour theme running throughout their products, featuring a range of pastel tones. This theme can be strongly associated with their products and I feel when developing my beauty images for the brand I need to incorporate this within in makeup and styling. 
These colours are used to create a soft, feminine feel within their products and packaging.
HAIR PRACTICAL
Creating volume

Beauty looks are not as simple as they might seem to achieve. Its all about prepping the hair properly in order to achieve a highly polished finish. Learning basic techniques to prep the hair will allow for further development into more complex hair styles. 

When using heated rollers in the hair the desired effect is to create volume all over the hair, not just from the root. Creating a strong base to the hair is essential when producing complex updo's. 


HEATED ROLLERS
- Heat rollers on setting 2
- The heat is going to change the shape and texture of the hair
- Once heat is reached, turn appliance down
- Go from the bottom to the top of hair (*depending on style)
- Take a section of hair, no wider than a roller, half an inch thick and roll
- To create volume lift upwards, using pin-tail comb to keep hair tight and neat
- Use grabbies or clips to secure roller
- Can add a small amount of hair spray at the root to hold volume before rolled
- Remove once roller has completely cooled

*For glamour hair tong from the ear downwards


TONGS
- Take section of hair, ensure tong is facing in the correct direction
- Use comb to protect client from the heat
- Turn heat down if client has dyed hair
- Hold for 12 seconds, ONLY if client has good condition hair
- Test time required on damaged hair
- Place grip in to cool set the curl 
(try to pin against the scalp to prevent kinks)

Monday 17 March 2014

PERFECT BASES
with Yvonne Gold

During our first practical session for this product we were introduced to the way of achieving the perfect base, suitable for fashion rather than TV or film. There are a few different types of makeup looks like fall under the umbrella of a natural base; DEWY, MATTE or SATIN. 

 STAGE 1 NATURAL
Many photographers love the look of natural skin and sometimes you will only be required to 'clean up' the skin. In order to achieve this a moisturizer should be applied all over the skin, worked in with the finger tips. Concealer can then be applied to any blemishes or imperfections, then blended out to create a seamless natural look to the skin.
If a natural matte look is required, a small amount of loose powder can be dusted across the T-zone.
To create a natural dewy finish to the skin a translucent gold can be used along side a moisturizer or Elisabeth Arden 8 hour cream. 

STAGE 2 NATURAL
If a flawless natural look is required a light layer of foundation can be applied as a base. It is essential this colour matches then neck in order for it to be undetectable. When applying the foundation it should only be placed within the center of the face, where the most coverage is required. 


Above shows my first attempt at create clean, flawless bases. The look on the left features a matte look skin and on the right a more dewy natural look. To create both these looks a started by massaging a small amount of moisturiser into the skin and then blending a thin layer of foundation on top. When creating a natural look its essential to make the look seem like real skin, not covering up freckles allows this to be achieved. On any other small blemishes I used a technique called spot concealing using a tiny brush to pin point concealer onto blemishes meaning the skin is not masked. 
When creating the matte version I just applied a small amount of loose powder across the face.

Collection of different versions of a natural base; clean, matte, dewy and satin finish.

RED LIPS
With Yvonne Gold

Learning how to produce the perfect red lip is a key skill to have as a makeup artist. We often brush off basic looks and opt for producing more Avant Garde looks, but going back to basics will help us to develop absolutely perfect makeup from natural beauty to fantasy. It is essential to have a perfect red lip in your portfolio to show future employers.
A red lip can come in many different forms and has to a staple in many women's lives for hundreds of years. Although it did not become widely accepted until the golden age of Hollywood in the 1930's. Red lipstick has a huge symbolic power and can be used as a symbol of prowess and sexual desire.  The shape created using the lipstick also holds strong symbolic representation.

Sharp point = Powerful, strong, harsh
Perfect Curve = Glamorous, sexual, sensual
Bee Stung = Innocent, soft, young


Red lipstick can be used in many different ways to create completely different looks. As well as altering the shape, altering the finish of a lipstick can dramatically change the feel of a specific look. Different finish can include matte, stained or high gloss, all of which can have different variations and intensities.


Below shows how to perfect the natural shape of the lip, I started by applying lip liner around out outside edge. We have two lines on the edge of our lip, one is much fainter than the other. To create the perfect shape the outer line should be followed. I know I have a lot of practicing to do in order to achieve a perfect shape! 


ILLAMASQUA VISIT
'Show me the future'

We has another industry visit during this project, this time it was Spob, head of professional development and key artist Charlotte from Illamasqua. Spob gave us an in depth view into Illamasqua and how to company develops their products, focusing on journey between the concept and the final products produced as a result. This year we are hoping to enter into the Illamasqua distinction in makeup awards so it is essential for us to understand what Illamasqua is about and how they work as a brand, as well as what makes them unique to the market.

AVANT GARDE & COMERCIAL BRAND
- Turning 6 years old this year
- Never paid for advertising
- Started with no marketing budget
- Essential to get the brand name known
- Must work across an international audience
- Social media plays an essential part to their success

STARTING POINT - The Story
'Create a character and a story'
Products will then be developed to fit in with that concept.


Whilst Spob was telling us all about Illamasqua as a brand, their key artist Charlotte demoed a look that Illamasqua produced for the Sorapol show at London Fashion Week. The look featured inspiration taken from 'the most beautiful Scottish witches' and Malificent. Overall creating a very modern interpretation of a witch, far from the green faced stereo type we would normally associate with witches. Illamasqua are great at creating completely new and innovating ideas.


This look focuses largely on flawless dewy skin with nude tones used across the complexion to create dynamic within the look. Brushing the brows upwards and sealing them down using Pears soap created a contrasting texture against the skin. Within this look they wanted to give an insight into what they see the future of makeup to be.  


Images from the Sorapol show LFW- AW14

The feel I got from the look was a real hybrid of creepy-beautiful - very corpse-like, but ethereal. Illamasqua really focused on a flawless base for the models, with a dewy, glow on the skin with a strong facial structure. Products such as the Hollow Cream Pigment and Gleam in Aurora, along with the Sculpting Duo achieved this effortlessly. Everything was kept very cool-toned to give a withdrawn appearance and the eye was given a very heady lid/socket with the Honour Pencil and lips were kept simple using the Intense lip gloss in facade, a muted grey pink shade. Eyebrows had the hairs brushed upwards and glued to the skin using soap.